It's hard to believe how easy it is to configure your projects with simple click+drag actions.
Picture yourself being able to effortlessly manipulate tasks, links and assignments. All with a beautiful tool that's a joy to use. You'll be up and running in minutes, not days.
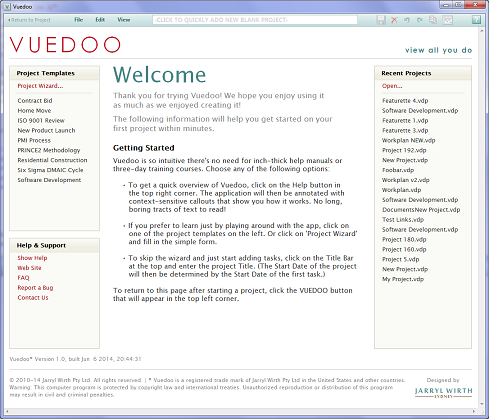
Welcome
When you start up Vuedoo, you are welcomed with a page that provides all the options you need to start work straight away.
In the center there's "getting started" information, which describes the available options. On the left is a list of templates
that you can use as a starting point, and a link to a project wizard. Or, if you want to get straight into it with
a blank project, just click on the title bar at the top and enter a name for your project. For existing projects, on the right
is a list of recent files you've opened, and a link to the Open File dialog. Click the help button for more detail.
|
 |
|
You can also access all the usual file commands from the File ribbon:

|
 |
Project Wizard
The project wizard helps you to easily set up the basic structure of a new project. It's just a rough starting point and
you don't have to get all the values correct now. The attributes can be changed later in the project properties dialog,
and phases and resources can be added or deleted at any time. In fact, you don't have to use the wizard at all if you don't want to
— if you want to just start adding tasks, enter the project title in the title bar, and the project's start date
will be determined by the start date of the first task. Note that the project title and the file name do not need to be the same.
Initially they are the same, but after the first save, changing one does not automatically change the other.
|
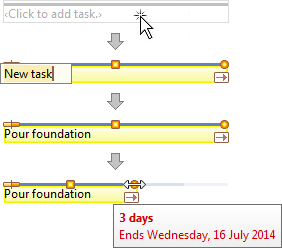
Create a Task
To add a new task, click on the ghost task — a light grey task labelled "Click to add task".
(If the ghost task is not in the desired position or is not visible, click wherever you want it to be,
or select an existing task to position it after the selected one.)
After clicking the ghost task, type the name of the new task and then press Enter.
If you want to add multiple tasks at once, press Tab instead of Enter, and press Enter when adding the last task.
Next, set the duration of the task by dragging the Duration drag handle — the orange circle at the end of the bar.
|
 |
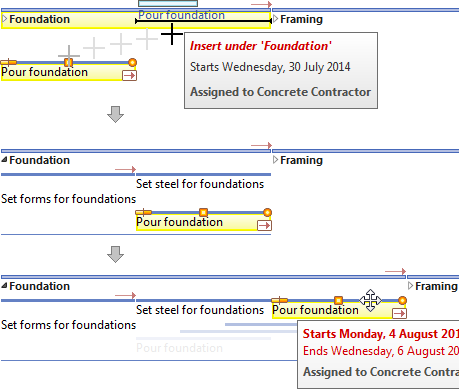
Insert a Subtask
To make one task a subtask of another, grab the Insert drag handle — the orange square in the middle of the bar —
and drag and drop the cursor on to the target parent bar. If the target summary bar is closed, it will open automatically when you drop on
it, so you can see the subtasks. (Note that the target bar need not be a summary task already — you can drag to a detail task and
it will become a summary task when the first subtask is inserted.) Then, if you need to, you can move the inserted task by grabbing it
anywhere except the drag handles and text and dragging it to the desired start date. Notice that dragging the sub task past the end of
the parent task automatically extends the parent task to fit, which in turn pushes the link to the successor task ("Framing"), moving it
out by the same amount.
|
 |
Create a Link
A link creates a scheduling dependency between the end of one task and the start of another.
To add a new link between two tasks, first select the predecessor task and grab the Link drag handle — the red arrow
at the end of the bar. Drag out the link arrow and drop the end onto the target successor task. After releasing the mouse button,
the successor will be scheduled to immediately follow the predecessor. Notice again that this also extends the parent task and
reschedules the parent task's successor. Multiple links can be created at the same time by first selecting a sequence of multiple tasks
(using Ctrl+Click) and selecting the "Add Link" button on the Edit ribbon.
|
 |
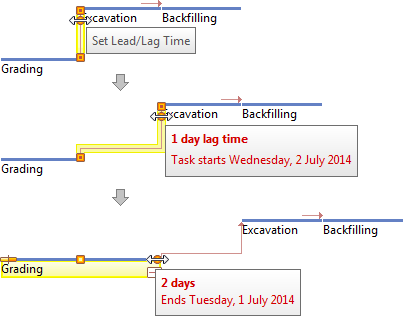
Set Lead/Lag Time
Usually a link schedules the second task to start immediately after the first one ends. However, a link may also have a lead time
or a lag time. A lead time is when the second task is scheduled to start before the first one ends; and a lag time is a
scheduled delay between the two tasks. To set a lead or lag time, drag the Lead/Lag handle — the orange circle
near the end of the link. Drag left to set a lead time and right to a set lag time. If the start or duration of the first task changes,
the second task will be automatically rescheduled so as to maintain the configured lead or lag time.
|
 |
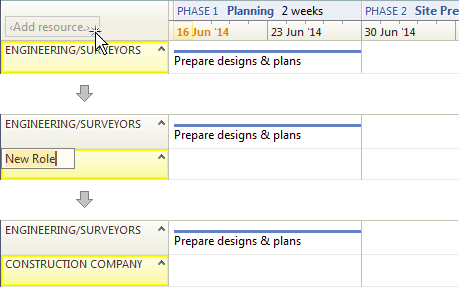
Create a Resource
To add a new Resource, click on "Add Resource" in the top left corner of the Tufte Chart. The new resource will be added after
the selected resource, or at the end if there are none selected. Type the role or name of the new resource and then press Enter.
If you want to add multiple resources at once, press Tab instead of Enter, and press Enter when adding the last resource.
Note that in Vuedoo a resource is more than just a name — the resource objects down the left side of the Tufte chart allow the
editing and display of all data about that resource, e.g. their role as well as their name, contact details, number of assigned
tasks et cetera. You select which data to display in the Choose Text dialog box.
|
 |
Assign a Task
To assign a task, simply drag it to the required resource row. If you drag a summary task, all subtasks will also be assigned
along with the parent.
If you reassign a sub task, there are two possibilities: if you drag the task bar, it will remain a
subtask of the original parent, even though it appears on a different row; however, if you drag it by the Insert handle, it will be
removed from the parent and will no longer be a subtask.
|
 |
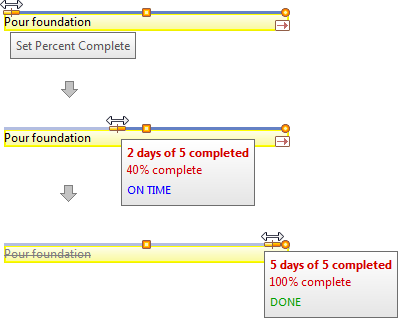
Set Percent Complete
As tasks are executed, their progress is defined by the usual method of setting percent complete.
Again this is easily set by dragging the percent complete handle on the taskbar — the orange rectangle initially
at the start of the task. (Duration complete can also be set in the Task Properties dialog). Note though that you can only
set the percent complete of detail tasks (the actual work items being done) —
the percent complete of higher level tasks are automatically calculated. When a task is 100% complete, the text turns grey
and is crossed off.
|
 |
Create a Phase
To add a new phase, click the "Add Phase" button on the Edit ribbon, then enter the name in the usual way.
A phase is just a special summary task, and as such, its start, duration, percent complete etc. are automatically calculated from the tasks
within it. Note that the Edit ribbon can also be used to add, delete or edit any object.

|
After you've created your project schedule, ensure everyone's on board: Communicate
|
 Follow